To get official help with your support related questions, please open support ticket in our support page.
Intro
Visual Composer is very unique plugin, it will help you managing your content at the WordPress site. Nowadays many websites have complex grid layouts with columns, tabs, sliders and etc. In the past, to create that type of layouts you should be html guru or shortcodes operator ninja.But not anymore! I've prepared a short video for you to get you up running in no time. See yourself how easy it is. Complex layouts combined with professionally designed plugins made easy!
Plugin Installation
Visual Composer installation doesn't differ from any other plugin installation process, so you might be familiar with this process already. If not, please follow instructions below.
- Login to your website
- Go to Plugins -> Add New section
- Click Upload link
- Browse to the plugin's zip file (it is located in the folder you've downloaded from CodeCanyon) and choose that file.
- Click "Install Now" button
- Wait while plugin is uploaded to your server
- Click "Activate Plugin" button
That's it!
On Visual Composer settings page (Settings->Visual Composer), you should select content types where Visual Composer should appear. Now you are ready to go. Create new post/page and switch to the "Visual Composer" mode.
Concept
After installing and enabling Visual Composer plugin you can start creating your layouts. There's one concept/design pattern you should know.
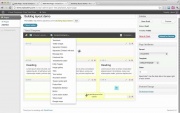
In the Visual Composer editor mode you'll have "Add element" button, which you should click or drag to the working canvas, to add content block or row to your page.
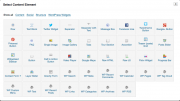
Clicking the "Add element" button will show the content element selection menu. Content blocks are divided into categories (Show all, Content, Social, Structure, WordPress Widgets).
Rows
Rows are used to divide your page into the logic blocks with columns, columns later will hold your content blocks. Rows can be divided into the layouts (eg. 1/2 + 1/2, 1/3 + 1/3 + 1/3, and so on). Your page can have unlimited number of rows. To change row's position, click and drag row's drag handler (top left row's corner) and drag row around (vertical axis).
Columns
Columns are part of the row and they hold your content elements inside them. Columns can be reordered. Click and drag column around (horizontal axis). That way you can group elements in logical groups and then drag them around with your mouse (to re-position).
Content Elements
This is a list of available content elements that can be placed on the working canvas or inside of the columns. Think of them as bricks. With those bricks you are building your layout. Most of the content elements have options, to set them click pencil icon. To save changes click save button.Available Content Elements
- Row
- Text block
- Separator (Divider)
- Separator (Divider) with text
- Message box
- Facebook like
- Tweetmeme button
- Google+ button
- Pinterest button
- FAQ (Toggle)
- Single image
- Image gallery
- Image carousel
- Tabs
- Tour section
- Accordion
- Posts grid
- Carousel
- Posts slider
- Widgetised sidebar
- Button
- Call to action button
- Video player
- Google maps
- Flickr widget
- Raw html
- Raw js
- Progress bar
- Pie chart
- + All default widgets that comes with WordPress
3rd Party Plugins Support
Occasionally Visual Composer is extended with support for popular third party plugins. Currently this third party plugins are supported:
- Layer Slider
- Revolution Slider
- Contact Form 7
- Gravity Form
After placing content element to the working canvas (page), click pencil icon to see options available for this particular shortcode (content element).
Templates
Templates allows you to save predefined sets of elements as a template and then reuse it when you'll need it next time. More about template system.
To take full advantage from template system, we suggest to check awesome Templatera addon for Visual Composer. Templatera is template system on steroids.
Theme Integration
If you are theme author and looking for a way to integrate Visual Composer into your theme, please take a look at this theme integration example page.
Extend Visual Composer
Starting from version 3.5 Visual Composer can be easily extended with 3rd party plugins or themes. Read more advanced stuff here.
Visual Composer Addons
FAQ
Here you can find answers to the Frequently Asked Question about Visual Composer.
There's a new version of Visual Composer available, how can I get it and update it on my site?
Starting from version 3.6.9 Visual Composer have auto update option. Visit Settings->Visual Composer->Updater and fill in required credentials. After that you will be able to use automatic WP updating mechanism.
First, login to CodeCanyon and under your profile click Downloads link. Re-download Visual Composer and extract it. Now navigate to the Plugins menu in your WordPress admin area. Deactivate Visual Composer, delete it. And upload new version that downloaded few seconds earlier. Activate Visual Composer.
How to reduce vertical space between rows
Starting from version 3.6 you can visit Settings->Visual Composer -> Design Options section and adjust vertical spacing between elements. For earlier versions (3.5.5 and lower): Insert this css code in your theme's style.css file or custom css area (if your theme has one). And change default 35px value.
body .wpb_content_element, body ul.wpb_thumbnails-fluid > li, body .last_toggle_el_margin, body .wpb_button { margin-bottom: 35px; }
Can I insert 3rd party shortcodes?
Yes. In the WYSIWYG editor you can insert [shortcodes] as usual. Basic scenario: Insert Text Block from Content Elements section, click Edit button and in the editor, enter your shortcode or place it between existing text content.
I have a layout that I created with Visual Composer and now I want to "clone" it for use on the other page/post, how can I do that?
Great question! You can create a "Template" and then insert it on any other page. Here's how:
- Design your layout.
- Select "Save current page as a Template" from "Templates" menu.
- Enter template name.
- Next, open (or create new) page where you want to place that template.
- Select your template from the "Templates" menu.
- It will be appended to the current page.
Another way. Switch to Classic mode and copy shortcodes that Visual Composer generated for you, create new page and paste them and switch to Visual Composer mode. You should see your layout copied.
How can change background color for Tabs, Tours and Accordion elements?
Starting from version 3.6 you can visit Settings->Visual Composer -> Design Options section and adjust color options for available elements. For earlier versions (3.5.5 and lower): To do that you will need to override default CSS rules. This is easy, open your theme style.css file (or another file wherr your css rules located) and place this snippet in it:
body .wpb_content_element .ui-tabs .ui-tabs-nav li,
body .wpb_content_element .ui-accordion .ui-accordion-header {
    background: #ff0000;
}

body .wpb_content_element .ui-tabs .ui-tabs-nav li.ui-state-active,
body .wpb_content_element .ui-accordion .ui-accordion-header.ui-state-active,
body .wpb_tabs .ui-tabs .ui-tabs-panel {
   background: #0000ff;
}

body .wpb_content_element .ui-tabs .ui-tabs-nav li:hover,
body .wpb_content_element .ui-accordion .ui-accordion-header:hover {
  background: #00ff00;
}
This will re-color background to red color, change hex value to your color.
Can I add my own shortcodes sets?
In short - Yes. Please check advanced documentation file (this is something that should be done by php developer).
After clicking Visual Composer button I see spinning icon for indefinite time...
Make sure you are running latest WordPress version.
I'm trying to install Visual Composer, but WordPress is saying "The package could not be installed. No valid plugins were found."
Please make sure to unzip original file that you've downloaded. Inside of it you'll find documentation and plugin .zip file (that should be uploaded to your site).
Content is not saved after the post/page update
First thing to check. Visit your profile page (Users->Your profile) and make sure that "Disable the visual editor when writing" is unchecked.
Call to undefined method WP_Error::resize()
Make sure you are running WordPress 3.5+
Most likely this is happening due to the pagespeed plugin installed on your server. Try adding this into your .htaccess file:
ModPagespeed offOutro
Thank you for your purchase. If you have any questions that are beyond the scope of this help file, please use our Support system to open support ticket.
Michael, WPBakery
Don't be shy - join us on Facebook. WPbakery website · Portfolio · Twitter @wpbakery


